This article is exclusively for Entra ID. If you use Active Directory please refer to this article instead
This article will help you establish a connection with Entra ID.
The initial steps will involve creating the required resources within Entra, enabling Connect to AD to communicate with Entra, specifically using the graph API.
The final step will provide instructions on how to input the Entra connection information into Connect to AD.
Step 1 - Create an App Registration
Please create a new app registration that will be used exclusively by Connect to AD.
Within your selected tenant, select Manage > App registrations.
Register a new app.
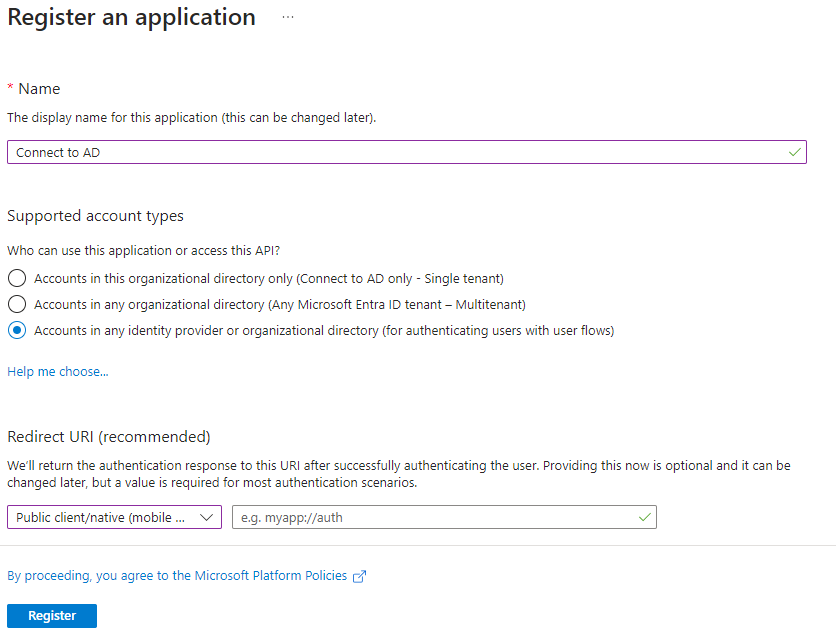
- We recommend naming it Connect to AD so that you can identify its purpose later.
- Set the Redirect URI to Public client/native (mobile & desktop)
After completing the app registration, please copy and note down the Directory (tenant) ID and Application (client) ID.
Step 2 - Create a Client Secret
We need to generate a secret to access the new app. To do this, go to the app registration and select Manage > Certificates and secrets.
Then, select Client secrets > New client secret.
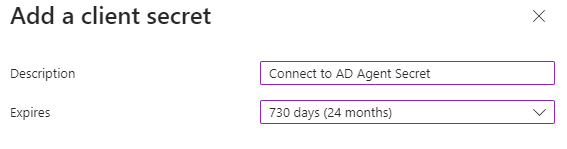
- We recommend naming it Connect to AD Agent Secret so that you can identify its purpose later.
- Set the expiration to 730 days (24 months) or whatever value your policies allow.
After creating the secret, please copy and note down the secret value.
- The secret value is only displayed for a few minutes; after that, it will be masked, so be sure to copy it while it is still shown.
- So that you know, we do not require the Secret ID.
Step 3 - Set API Permissions
We need to set API permissions so that the app can access specific Entra graph resources.
To do this, go to the app registration and select Manage > API Permissions.
Add a new API permission by selecting Add a permissions. and then select the Microsoft Graph option
Select Application permissions
Search for User related permissions and select the permissions that allow the app to read and write as shown below.
Search for GroupMember related permissions and select the permissions that allow the app to read and write as shown below.
Now that the permissions have been set, we will still need to grant admin consent to the added permissions.Select Grant Admin Consent for the App
All API permissions should have Admin consent granted as shown below.
Now the app registration, client secret and API permissions are done, we can setup and establish the Entra connection in Connect to AD.
Step 4 - Enter the Entra Connection Details
During the Entra App Registration steps, you should have collected the following values:
- Tenant ID - The Entra ID tenant that we will be targeting
- Client ID - The Entra ID application that is setup for Connect to AD
- Client Secret - The secret (like a password) that is used to establish the connection to Entra ID.
Enter the Tenant ID, Client ID, and Client Secret into the Entra Connection fields within Connect to AD.
Comments
0 comments
Please sign in to leave a comment.